Showing posts with label sailmaking. Show all posts

Sunday, May 27, 2012

Decks On! And Sail Test-Fit to Spars

With a bit of time this morning, I glued and nailed the fore & aft decks onto the hull.  This is another milestone moment, at it indicates we're pretty much done with the right-side-up segment of the build. 

The decks were cut pretty accurately to the plan dimensions.  Installed, they overhang the sheer a little, which indicates that either they weren't cut as accurately as I thought, or the hull is slightly narrower than it should be.  Either way, we're talking about a relatively small discrepancy, so I won't worry about it.  I'll just cut/sand the overhang off, and nobody will ever know.
I mixed up way more epoxy/fiberglass powder glue than I needed, so after I was done nailing down the decks, I stirred some silica powder into the remaining epoxy and used it as a fairing compound to fill gaps and smooth lines around the handles and deck beams. 

Next up for the hull: we'll pull it out of the porch, invert it on saw horses, and radius the chines in preparation for the exterior glass tape.  When that step is done, it will be time for a final coat of epoxy, then paint!  

The other big news is that I scored a twelve-foot length of bamboo at the second-hand building materials shop yesterday.  Cost me all of $3.22, which is less than a tenth of what it would  elsewhere.  It's too thin to use as anything but a spar, and may not be stout enough for that, even.  But it's a thick-walled variety, and seems quite strong.  So I'm going to try it.  If it breaks in use, we'll just replace it with something else.

I fitted it to a crotch I'd cut earlier, and pinned and lashed them as per the plans.  I must say, I'm a bit nervous about that joint.  But Wharram says it will hold, so who am I to argue?

With two spars ready, and the sail more or less complete, I couldn't help arranging it in the back yard to see how it looks.  With Puff the cat supervising, I laced the sail onto the spars until I ran out of line about 3/5ths of the way around.  It looks handsome, but I must confess that my new bamboo spar may be about 6" too short. 

As disappointing as that is, I can still use it as part of my hiking platform.  It certainly won't be wasted.  But that means I need to figure out how to fit a Y-joint to the carbon fiber windsurfer mast.  I might end up using store-bought lumber to make that piece, as I can't imagine turning a chunk of found lumber into the perfectly round 1.75" dowel required to fit the inside of the mast.

Thursday, May 24, 2012

A New Wharram Melanesia Video on Youtube


We've seen just a little bit of JIPE98's Melanesia before, but he's really cooking in this one.  The blurb beneath the video states that he hit 8.4 knots on this run from Ouemo to Uere, New Caledonia.  That's really cooking for a 16' outrigger canoe!

The video appears to have been shot handheld by his crew, and details of his one-handed steering setup hover just outside the frame.  But there are some stills of the canoe from above at the end of the video, and she's a very nice-looking example.

I look forward to seeing more of this Melanesia in the future.  It looks like he's got a great boat, and a beautiful setting to sail in.


Meanwhile, in my own build, I wasn't able to apply further coats of epoxy to my fiberglass-taped fillets yesterday because a cold front blew through, bringing 50°F temps and a day of much-needed rain.  So I continued stitching the second rope to my sail, which is almost complete now.  Today looks favorable for epoxy work - higher temperatures, at least, and the rain has ended.  So I hope to be able to finish coating the fillet glass today, and move on to installing the decks tomorrow.

Friday, May 11, 2012

Sail Progress: Bolt Rope Installed

With some weird late-winter weather interrupting our early summer, I've been able to spend some time sewing the bolt rope into the edge of my sail without feeling guilty: surely you don't expect me to work on the hull when it's 43°F and raining?!?

The bolt rope is an actual rope sewn into a hem along the edge of the sail.  It provides a simple way to reinforce the edge so that stresses are well-distributed without a complicated seam.

Tonight, I put the finishing stitches in.  For those of you keeping track at home, that's about 26' of hand-stitching. Sewing is not my strong suit, so it was tough work.  I actually missed the infernal device!  But the sail really looks like a sail now.

There's still more rope to sew on, but that goes outside the hem, and is merely sewn/lashed to the interior bolt rope at 6" intervals.  I suspect it will be quicker work.  Before I can do it, though, I'll need to buy some line at the local hardware store. I don't have enough of the used polypro rope I pulled out of a trash can to complete the job.

I'll try to pick up that line, and maybe some sandpaper, tomorrow. And if this weather holds, I might just pull out the infernal device again to sew on my sail numbers and Wharram insignia, too.

Wednesday, May 9, 2012

More Sailmaking

For some reason, I'm loathe to break out the sandpaper and finish the fillets in my hull.  But time's a-wasting, so I need to make some sort of progress on the boat.

There's still the sail to work on, so this morning my son and I broke out the infernal device the sewing machine.  We retouched some segments of the center seam that were sloppy or crooked, or where the machine skipped stitches.

Then we got out the batten, and sketched in the hollow in the leach (mouth?) of the sail.  I triple-checked to ensure that it really was cut that way, and not just shown curved in the drawings because that's how it looks when you're sailing.  But no, I'm pretty sure that's actually how it should be cut.

So we sketched and cut the hollow, then hemmed it to a length of polypropylene webbing.  It looks much more like a crab claw sail with that curve in place.

The next step will be to hand-stitch the bolt ropes into the seam along the head and foot of the sail, and again outside the seam.  That rope will be used as eyelets when we lace the sail to the spars.

Speaking of spars, I picked up three impressive lengths of straight, dead aspen at a friend's cabin last weekend.  I haven't decided yet if they're to be spars or kiato, or some of each.  But they represent some more non-hull progress.  So even though I'm avoiding the fillets, I'm still moving the project forward.

Thursday, October 13, 2011

Sailmaking: Sewing Machine Works!

My last couple attempts at stitching the center seam on my sail failed because the sewing machine couldn't handle the 4 layers of fabric, plus 4 layers of masking tape, that I was asking it to sew through.  (I hear that Sailrite machines can handle much heavier stuff than our typical household machine, but I'm not sure even one of those would have been able to do what I was asking.)

The two halves of my crabclaw sail,
together again - for the first time.
Looking at the flat-felled seam instructions from that DIY camping gear site I linked to last time, I decided to try the seam in stages as they suggested.  It was harder on me, because the fabric wasn't all locked in place like it was with my masking tape arrangement.  But it was much easier for the machine, and, with help and coaching from my oldest son, who did a sewing unit in 4-H a couple years ago, we got it done.

As for quality, let's just say it will probably be good enough.  While not all of the wrinkles shown at right are sewn into the sail, a few of them are.  I had problems guiding the fabric straight through the machine, which caused some wandering.  I had problems with the two pieces of fabric feeding at different rates, which created wrinkles.  And I probably didn't have everything pinned perfectly to begin with, either.  Here are some examples:
Bunching caused by one side feeding faster than the other,
then being "caught up" too quickly.
Wandering....  The weight of the fabric made feeding
tough, and it sometimes got crooked on me.


If the sail were plywood, these inaccuracies would represent my weakest effort yet.  But it's not plywood, it's cloth, and I've never done anything like this before.  So I'm going to declare victory and move on. 

Moving on....  I think I should reinforce some areas where the wandering was particularly bad.  Then the sail still needs the polypro webbing sewn across the mouth of the claw (probably by machine once more).  And I'd like to add some reinforcement strips to the tack.  Then I need to sew in the polypro bolt rope, which I'll do by hand.  And finally, I need to attach my snazzy red Wharram logo and sail numbers, which I think I'll try to do by hand again.

So there's a bit of work yet before we have a complete sail.  But tonight's progress moves the project forward past a tough stumbling block, which is great news.

Tuesday, October 4, 2011

The Infernal Device

I spent some time last night trying to join the two halves of my sail with my wife's 1980's-era Kenmore sewing machine.  First, I had to pin the sail together in the proper alignment.  I'm planning to use a flat-felled seam, and I want the stitching to pass through all four layers of fabric, so there's a lot of work necessary to get the sailcloth in the proper arrangement before you start sewing.

I tried pinning, but it would have taken dozens of pins to hold the entire seam in place, and then how do you sew it?  Then it occurred to me to use masking tape to hold the edges together correctly.  I can sew right through the masking tape, and the tape should just tear off as the sail is used.  After a bit of work, that job was done, and I had a rather stiff pre-assembled seam consisting of 4 layers of sailcloth and 4 layers of masking tape.  To the machine!

But the sewing machine kept binding, which would require undoing the stitches, cutting the thread, clearing the jam, rearranging everything, and trying again.  Over, and over again.  Once, I even broke a needle; another time, I accidentally disassembled the bobbin assembly while trying to clear it.  That took 15 minutes to sort out....  Somewhere along the way, the thread got routed wrong and the machine was no longer producing stitches. 

My wife was very patient as I clumsily abused her machine.  I eventually figured out that the jamming was due to my not holding the free ends of the thread taut as I started out.  Armed with that knowledge, I successfully produced several inches of pretty, zig-zag stitches before the thread frayed in the needle and I had to stop.  Sigh.....

I knew this process wouldn't be easy, but I was unprepared for the complexity and finicky nature of the sewing machine.  I'll try to pick up a heavier needle and try again tonight.

Meanwhile, here's a neat write-up of outrigger canoes and small catamarans from a British sea kayaking web site.  For the record, I was seriously considering building a sea kayak before I decided on the Melanesia.  I like the mobility and versatility of the kayak, but I wanted something that could carry a flexible number of people, and sail effectively.  The link above touches on all of these points.

Sunday, October 2, 2011

Epoxy Fillets 2, Rich 0

My second attempt at filleting the bow went a little better.  I made a stiffer mix this time (less like Dairy Queen soft-serve and more like regular ice cream).  It was more workable, and I hit on a pretty handy way to apply it in tight spaces: put epoxy mix in a zip-log bag, snip off a corner, and use it like a pastry chef's icing bag to squeeze the epoxy into spaces you can't reach with regular tools.

However, it didn't all go my way.  After filleting the forward third of the bilge to the proper radius, I cleaned up and went to work.  When I got home in the evening, I found that the epoxy had flowed downhill and pooled in the bow.  I now have the world's thickest fillet at the bow.  In the photo at right, you can see how the areas in the foreground were, at one time, covered with whitish epoxy -- but it has all flowed down to the end of the hull, where it's pooled much deeper than necessary. 

One other minor victory: note the clean edges on my fillets at right.  This is due to my friend Steve's masking tape technique, which really does produce a cleaner result than the alternative.  But overall, I have to say that epoxy filleting is my least favorite part of the whole process so far.

Finally, I picked up a cheap nylon windbreaker at the thrift store the other day, and from it cut out the Wharram insignia and sail numbers that will eventually go on my sail, once the sail is sewn together.  The sail number is the number of my plan set; the logo and number together uniquely identify my boat.

I think it looks pretty sharp.  My wife is not fond of the Wharram logo, as she feels that it looks like a pair of breasts.  She's right, it does -- once somebody points it out to you -- and I'm pretty sure the resemblance not accidental, as it was supposedly taken from some prehistoric goddess emblem.  But while I wouldn't sew mudflap girls or a Playboy bunny logo onto my sail, I don't think the resemblance is enough to justify keeping the designer's logo off the sail.  I'm proud that my boat is a Wharram, and I want people to know.  So the logo stays, and if anyone asks, I'll tell them what I just wrote.

Saturday, June 18, 2011

Sailmaking

I slathered a layer of epoxy on the interior sides of some panels the other night, but the really big news here is that I've begun to make my sail.  I got the fabric today from Rockywoods, and by the end of the evening I'd measured and cut out the two halves of the sail.

The fabric (a 4-oz ripstop polyester) is attractive and lightweight.  One side is coated with a urethane treatment of some sort, so there's a slight color difference between the sides.  But appearance isn't high on my priority list, and anyway, it'll look way better than a blue tarp would have.

Squeezing 57 sqft of sail into 5 yards of fabric.
I rolled it out and followed the instructions in the plans for squeezing the entire sail into 5 yards of fabric.  (The plans discuss doing this with 6' wide fabric; my fabric was about 5' wide, but it fit.  Just barely....)

For a while, I was at a loss as to how to get the shape from the plans to the cloth.  The plans list the length of the curved head and foot of the sail, and they list the length of the center of the sail, but there was no list of offsets at various station lines like there had been for the plywood.  There was also some confusion as to how I could get the proper curve for the hollow at the open end of the crab claw.

I had learned in my navigation class how to use an engineer's scale to read a measurement from a nautical chart, and I had heard somewhere that you can do the same thing with boat plans.  So I got the engineer's rule from my nav gear and confirmed the width of the sail at the top, which allowed me to determine that the sail curves inwards one foot from the tips to the center.  Once I've joined the two halves, I'll draw that curve in with a batten.
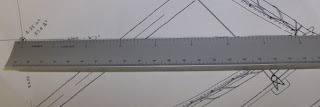
If you look closely at the full-sized version of this pic, you can see that the plans read 6'7" (or 79") along this line.  The plans are at 1:10 scale, and I've laid the 1:10 edge of my engineer's rule along the line.  This allows me the determine that the length shown is indeed 79".  It's unnecessary for this sort of situation, but this technique is useful if you want a dimension that's not given in the plans.  As long as your rule has a scale that matches the scale of your plans, it will work.

I decided the best way to get the shape of the long curve onto the cloth would be to carefully mark the three corners, then mark the length of the curved side on a batten, and then use exactly that much batten to draw in the curve.  My boys helped again - they're getting to be pro's after the plywood drafting job.

I soon had the shape of the two sail halves drawn in, but it would be a mistake to cut along those lines.   The center seam needs some overlap, and it takes fabric to enclose the rope that's supposed to strengthen each edge.  So I traced in a second line in a different color, 1.5" from the edge of the sail, and this is the line I cut.

When it was all done, I had two halves of a crabclaw sail.  I couldn't resist the temptation to lay them out together to get a sense of the full size of the thing.  At 57.5 sqft of sail area, it's a pretty powerful rig.  Setting it out in the living room brought that home a bit - it seems bigger than the sail for my El Toro dinghy, which weighs about the same.

Next up in sailmaking: I'll be pinning and stitching the center seam together.  I also need to procure some rope for the edges so I can sew those in.    I may also cut some reinforcement radius pieces for the corners out of my meager scrap pile.  It seems smart - most sails have reinforcement patches there.

Meanwhile, I still have interior epoxy coating to do.  Everything is supposed to get two coats, with a bit of sanding between.  And if I'm close to having a sail, I really ought to consider getting the spars finished.  Plenty to do!

Wednesday, June 15, 2011

Big Spender!

My tight budget finally reached the point where I was able to order the epoxy, fiberglass tape, and other specialty supplies needed to assemble the hull.  So today, I placed an order with Merton's  Fiberglass & Marine Supply for those materials.  Their prices were good, their website informative.  They don't do e-commerce, but they took my order over the phone (~$155) and promised to ship it out later in the afternoon. 

There were a few decisions to agonize over in this purchase.  First of all, what epoxy to use?  Since I was given some cast-off System3 epoxy, with mixing pumps, from a friend's Eastport Pram build, it seemed best to stick with that brand.  Next, what size?  The cost per unit drops steadily as the size of the container goes up.  The plans recommend (3) of the West System "A" size packs, which are about a quart each; Mertons' offered System3 in 0.75gal or 1.5gal sizes.  The bigger size was very tempting, especially because the smaller pack is probably not quite enough to build this boat.  But I still have a quart or so in the hand-me-down jugs, so I decided to stick with the smaller pack.

Next, I turned to sailcloth.  Sailrite sells a 4oz Dacron (polyester) sailcloth for $11.95/yard, but I calculated that I'd need 5 yards of it.  Sixty bucks is a bit expensive, especially if one makes a mistake with it.  I found a local supplier - Rockywoods Fabrics in Loveland, CO, mentioned earlier in the blog - who carry a 4.5oz ripstop polyester fabric for $5.09 per yard. That puts 5 yards into the ballpark of polytarp costs (around $23 at Home Depot for a tarp large enough to make the sail, -vs- $26 for the Rockywoods deal).  I'm sure the Dacron sailcloth would be superior, but I'm just as sure the sail's performance will be limited by workmanship more than materials in any case.  So Rockywoods wins.

And speaking of workmanship, the plans discuss in detail how to finish the edges of the sail, but they don't discuss how to stitch the two panels of the sail together.  I've never done this sort of thing before, so I'm a bit concerned about that.

Tim Anderson's illustration of a felled seam
Proa enthusiast Tim Anderson to the rescue. His account of sailing around Yucatan in a homebuilt proa included some notes and drawings of various stitch and seam types. (Search for "seam" to find the relevant passage, or just read the whole account if you need a little entertainment.)  On the basis of Tim's discussion, I'll be joining the halves of my sail with a felled seam and avoiding "Frankenstein" stitching.


The next big steps out here are to butt the hull panels together and coat all interior faces with a layer or two of epoxy.  Until the Merton's order shows up, I'll be spending my spare time on those tasks.  More news as it happens.