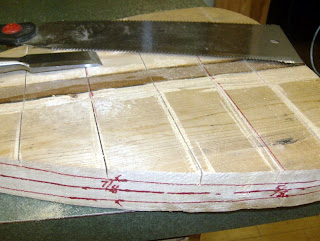
A glance through the plans reminded me of a method I'd overlooked. Wharram suggests making a series of cuts in the surface of the paddle, and then chiseling the surface down to those cuts. This seemed more controlled than the circular saw, but faster than the plane, so I had a go at it.
 |
| My latest paddle blank with centerline, thickness guidelines and station lines sketched in. The station lines have been cut down to the thickness with the pull saw; next up is the 1" chisel. |
With all that done, I took my new 25mm chisel ($6) and a spare chunk of wood as a mallet, and the chips began to fly. I found this method quite quick and much easier to control than the other ways I've tried for shaping paddle blades. The entire blade was roughly shaped on both sides within a couple hours.
It didn't go completely without mishap, though. I had a little trouble controlling the depth of the cut, leading to a "porpoising" motion where the chisel slightly dove and rose, dove and rose, as it travelled along the grain. This led to a couple minor incursions deeper than I'd intended to cut, but no big deal. The worst moment was when the crazy grain behind a knot grabbed it and caused it to dig in deeply. That hole will need a filler of some sort. From then on, I used the saw to cut knots off rather than trying to chisel through them.
Overall, the paddle came out at about the marked thickness, and very rough. By the time I sand the rough surface smooth, I suspect I'll be left with a slightly fragile paddle - but a little fiberglass should take care of that, and I was planning to glass it anyway. Next time, I'll shoot for a slightly thicker result from the chiseling, so that I can then plane and sand the last millimeter or two down to the correct thickness.
As for the shape, the blade area is a little bigger than my first teardrop paddle. (Remember, these are for propulsion, not steering; the teardrop shape mimics the popular design in current use for ocean-going outrigger canoes.) Both paddles are five feet long, which is probably too long; I'll cut them down once we get a chance to try them out in the boat. Once they're at the proper length, I'd like to add a lashed-on "T" grip at the top of each handle. I'll use the larger one myself, and my wife or kids will use the smaller one.
Next up? Steering paddle, take 2. After ruining the first one, I'm trying another cut from a single scrap 2x12 I have handy. After that, there will be nothing left to do but start on the hull.
No comments:
Post a Comment