Tuesday, May 24, 2011

Chiseling a Paddle

The other day, I laminated another teardrop paddle blank for propulsion purposes.  I cut the shape out with a 6 tooth-per-inch blade in my brother's jigsaw, and then faced the issue of shaping the paddle thickness.  Earlier, I mentioned getting a belt sander for this purpose, but they're not cheap and I'm not convinced it's a tool I'll need anywhere else on the project, since I already have a more modest electric sander.  I could try a "surform" (surface forming plane - basically a flat rasp blade on a plane handle) but I'm not sure that would be much faster than the block plane I already have.

A glance through the plans reminded me of a method I'd overlooked.  Wharram suggests making a series of cuts in the surface of the paddle, and then chiseling the surface down to those cuts.  This seemed more controlled than the circular saw, but faster than the plane, so I had a go at it.

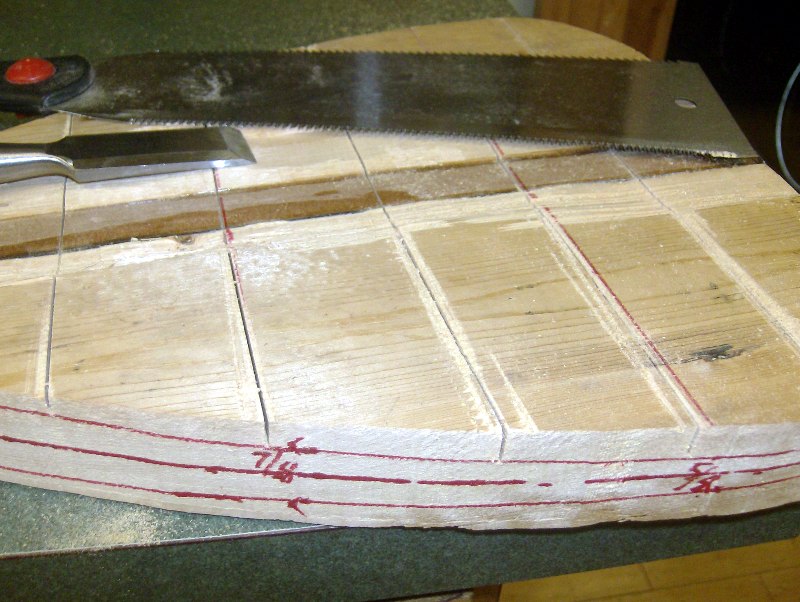
My latest paddle blank with centerline, thickness guidelines
and station lines sketched in.  The station lines have been cut
down to the thickness with the pull saw; next up is the 1" chisel.
First, I marked the centerline of the paddle's blade thickness and marked station lines every 4" along its length.  Then, I carefully measured my desired thickness at each station line, and connected the dots with a continuous line along each edge of the paddle.  Finally, I used my pull saw to cut down to the sketched thickness at each station line, and once between each pair of stations for good measure.

With all that done, I took my new 25mm chisel ($6) and a spare chunk of wood as a mallet, and the chips began to fly.  I found this method quite quick and much easier to control than the other ways I've tried for shaping paddle blades.  The entire blade was roughly shaped on both sides within a couple hours.

It didn't go completely without mishap, though.  I had a little trouble controlling the depth of the cut, leading to a "porpoising" motion where the chisel slightly dove and rose, dove and rose, as it travelled along the grain.  This led to a couple minor incursions deeper than I'd intended to cut, but no big deal.  The worst moment was when the crazy grain behind a knot grabbed it and caused it to dig in deeply.  That hole will need a filler of some sort.  From then on, I used the saw to cut knots off rather than trying to chisel through them.

Overall, the paddle came out at about the marked thickness, and very rough.  By the time I sand the rough surface smooth, I suspect I'll be left with a slightly fragile paddle - but a little fiberglass should take care of that, and I was planning to glass it anyway.  Next time, I'll shoot for a slightly thicker result from the chiseling, so that I can then plane and sand the last millimeter or two down to the correct thickness.

As for the shape, the blade area is a little bigger than my first teardrop paddle.  (Remember, these are for propulsion, not steering; the teardrop shape mimics the popular design in current use for ocean-going outrigger canoes.)  Both paddles are five feet long, which is probably too long; I'll cut them down once we get a chance to try them out in the boat.  Once they're at the proper length, I'd like to add a lashed-on "T" grip at the top of each handle.  I'll use the larger one myself, and my wife or kids will use the smaller one.

Next up?  Steering paddle, take 2.  After ruining the first one, I'm trying another cut from a single scrap 2x12 I have handy.  After that, there will be nothing left to do but start on the hull.

Wednesday, May 11, 2011

Steering Paddle A Complete Loss

Just a quick entry today to say that I've decided to scrap the steering paddle.  As explained in my previous post, my ill-conceived attempt at tapering the blade thickness with a circular saw went badly.  I attempted to clean it up last night, but soon decided it was a total loss - if there were only one cut that went too deep, I might salvage it by epoxying on some strips in the affected area. But with several irregularly-shaped intrusions, it's just too much work to recover the correct paddle form.

The good news is that the other paddle I attempted to shape with the circular saw came out okay, and is fully shaped and ready to sand smooth.  It's also nice that I have a 2x12 ready for a second attempt at a steering paddle without having to laminate pieces together.  I'll try to loft and cut out a paddle from that piece of wood with the jigsaw tonight, and this time, the shaping will be all belt-sander and block plane.

Tuesday, May 10, 2011

Good [Paddles] Come From Experience; Experience Comes From Bad [Paddles]

I've been spending a lot of time shaping my steering paddle and one propulsion paddle from the thick laminated blanks.  In the process, I'm really working the old Stanley block plane hard, producing an impressive quantity of curly cedar and fir shavings.  My planing muscles are pretty achy, and I'm blistering in the places where the plane fits my hand awkwardly.  All for relatively meager progress - extrapolating, I can expect at least a month more of this before the paddles are properly shaped.

It is for this reason that I decided to trace the taper onto the edges of the blades and trim them down with my circular saw.  Ten minutes worth of cutting would save weeks of shaving, I reasoned.  And I'm pretty good at following a line with that tool.  It seemed like a judicious application of power tools.

A badly scarred blade.  Even
Elliott, sighting along the blade,
is disappointed in the result.
My first pass on the left side of the steering paddle cut a bit too deeply.  At the time, I thought it was due to the not-quite-square edge I was resting the saw on.  When I flipped the paddle and the second left-side cut turned out even worse, I should have understood what was going on.  But instead I went on and cut the other paddle, giving the line a little extra room to avoid repeating the problem.

It turns out that my circular saw was slightly out of square; the thin cuts I have been doing lately were in material (plywood, thin lumber...) too thin to show the angle, but cutting a full three-plus inches deep, it was very noticeable.  The fact that the right-side cuts were turning out okay, while the left-side cuts were not, should have clued me in.  But sometimes we're resistant to the lessons available to us.  It takes a real mess to open our eyes to the problem.

That red line is the center of
the edge.  The worst error
didn't just eat into the paddle
surface, it ate half of that
side of the paddle away.
The steering paddle is badly scarred; I'm going to have to add material somehow, either by laminating some strips of wood back onto the worst area, or by building the surface up with thickened epoxy. And that means I won't be able to use a clear finish on it.  Sigh....


This paddle was not as badly disfigured, but it's
still going to be thinner and weaker than I
meant for it to be.
The propulsive paddle turned out better.  It is going to be thinner at the end than I meant to make it, but not terribly so; I will probably glass the blade to increase its durability, but that's okay, I have scrap glasscloth and epoxy, and I was considering glassing it anyway.

The big lesson here is that it's always a mistake to use the wrong tool.  The kind of shaping I'm attempting really ought to done with a bandsaw and belt sander, not a block plane.  Lacking a belt sander, but wanting faster progress than I was getting with the plane, I tried a circular saw.... You can't use a circular saw to do delicate shaping, any more than you can use a hammer or a soldering iron.  So I'm going to check Craigslist and pawn shops for inexpensive belt sanders.  And in the meantime, I'll be muttering the wise words of Mr. Miyagi under my breath while I endlessly plane away the worst of my mistakes: "Wax on, wax off."

Friday, May 6, 2011

Paddle Shape

I laminated my second paddle this morning.  This one is going to be used for propulsion, rather than steering - though I suppose it could serve for steering purposes in a pinch.  It's interesting how different the shapes are.

Typical paddle design
for inland lake canoes
Boris Potschka with his
steering paddle
The Melanesia plans describe the steering paddle shape as a slender leaf profile, the blade being about 42" long and only 8" wide.  At right is Boris Potschka with the paddle from his Flickr set about the Melanesia he built a few years ago. Having grown up with canoes on Maine lakes, and oars on collegiate rowing shells, the design looks pretty foreign.  The canoe paddles looked like the one on the left, more or less. The rowing shells used very long oars with blades even smaller than the canoe paddle.

Typical ocean-going
outrigger canoe paddle. 
The teardrop shape seems
ubiquitous, (though not
necessarily indigenous)
and the blade is angled
relative to the shaft.
A little browsing online quickly showed that the Polynesian ocean-going canoe paddle style is much different.  Most of them have a bottom-heavy shape like the paddle at left, with a moderate angle between the blade and the shaft.   Inuit kayak paddles propel much lighter skin-on-frame craft, and their blades are straight and considerably smaller - more like the inland lake canoe paddle blade above.  Some are even more like a shaped 2x4, with very little blade surface area.  Chinese yuloh blades are shaped more like the inland canoe blade as well.  So the fat-bottomed blade is an oddity in the wider world.

Thinking about the physics here.... Obviously, a larger blade allows greater transmission of force to the water, but the trade-off is that it takes more muscle to drive it through a stroke.  Similarly, the blade is travelling in a modified arc; a longer paddle shaft will require more muscle than a shorter one, and will pay for that increased cost with a slightly greater output. I'm thinking of these variables as being akin to the gearing on a single-speed bicycle - since you can't change gears, it's important to get the shape right.   Putting the fattest part of the paddle at the bottom seems likely to maximize the potential for force transfer and the muscular requirement.  Beyond that, blade shape is at the center of a PhD-level fluid dynamics scenario that I am certain I don't understand well.

But I do know that trying to use a too-big paddle can cause shoulder injuries, which we certainly don't want.  So that points towards using moderate blade areas and shaft lengths.  On the other hand, a long shaft or fat blade can be cut down, but you can't really make a small paddle grow bigger.  And I don't intend to spend too much time paddling this canoe - I bought the sailing-only version of the plans, and the paddles will serve as a form of auxiliary power only.

So in the end I've decided to follow the Polynesian shape, and to base my freehand drawing of the blade template on the rough dimensions of medium-large paddles I see online.  They seem to be around 8-9" wide and only 16-18" long - a 1:2 ratio that should be fairly easy to duplicate.  As for shaft length, I am starting with 5' shafts and will probably keep one long and shorten another for the kids to use.  Then, after a bit of use, if it seems like our shoulders are sore and paddling is too hard, we'll trim the blades down a bit.

So far, I have two of the three paddle laminations done.  I'll trace the blade shape on a folded piece of paper to ensure symmetry, then unfold it and trace it on the blank, and cut it out with my brother's electric jigsaw.  Then it's a matter of planing, sanding and fairing the blades until they are what they should be.  I'm still deciding whether to glass the blades for durability or not.  I'll post some photos of the shapes when I get them cut out.

Sunday, May 1, 2011

Laminating the Steering Paddle

The cuts Ray and I made on his table saw the other day relieved a bottleneck in this build.  Until the lumber was ripped, I couldn't loft the patterns on the plywood, and I couldn't laminate the steering paddle.  In other words, I couldn't work on anything but finding trees to use for the outrigger, poles and spars.

Applying epoxy to the mating edges
Well, that's finally over.  I haven't had the opportunity (or audacity?) to take over the entire living room for the lofting step yet, but I'm under way on the paddle.  I borrowed a pump of the hand-me-down System 3 epoxy from my brother's Teal project and clamped the steering paddle blank together this evening.  As I write this, it's sitting there on the plastic-covered kitchen table, waiting for the epoxy to cure.

You really have to squint to see it
as a paddle at this point
It doesn't look much like a paddle at this stage.  It's blocky and thick, and it takes some imagination to envision the slender, streamlined leaf shape of the finished product within.  I'm sure it will take many, many hours of shaping to get there, but I'm game.  I think I'll let the epoxy cure for 72 hours, then cut the profile out with a hand saw and begin peeling away everything that's not a paddle.

A quick word on the process..... Why glue the paddle together, rather than just cutting it out of a single large piece of wood?  Well, I've been told that laminated sections are less susceptible to warping than solid wood, due to the mixed grain orientation of the various pieces.  I'm hoping that's true - I'm not sure the grain orientation I chose was optimal, but it allowed me to work around the knots I have to deal with.

It's also cheaper to work with 2x4's than it would be to buy a single piece capable of containing the whole paddle profile.  But I have a scrap 2x12 lying around that I might use to make a second steering paddle, so that I can see whether there's a difference in their longevity. 

Anyway, it feels exciting to be past the table saw bottleneck.  Hopefully, there will be time for lofting later this week, and then I can start the plywood cuts.  I've also prepared enough cedar and fir pieces to make a pair of regular non-steering paddles.  So I've entered a new, busy period of the build, and I'm idle no more.  It feels good!